Maintaining kitchen utensils is crucial for a hygienic cooking environment. A rotary cheese grater is a valuable tool for any home cook or professional chef — but its complex design can make cleaning a challenge.
Proper maintenance not only ensures it continues to function effectively but also prevents the buildup of bacteria and food residue.
Key Takeaways
- Regular cleaning prevents bacterial buildup
- A clean grater ensures better performance
- Proper maintenance extends the lifespan of your utensils
- Follow simple steps for effective grater cleaning
- Natural solutions like vinegar and baking soda work as well as commercial cleaners
Understanding Rotary Cheese Graters
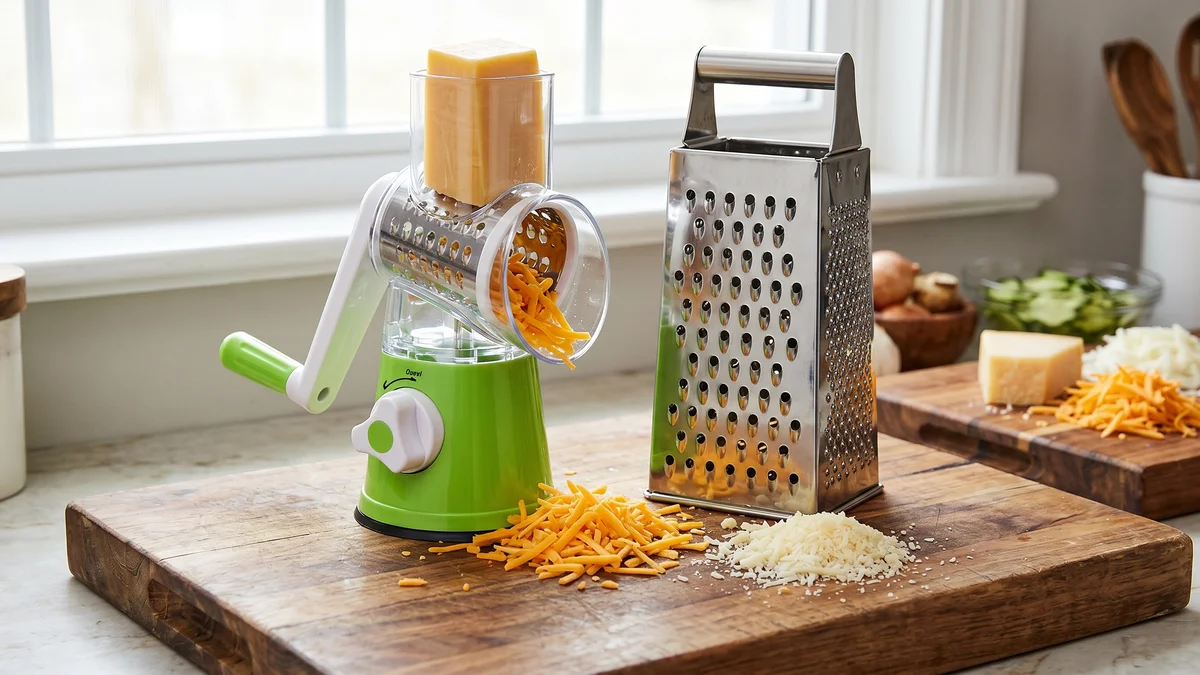
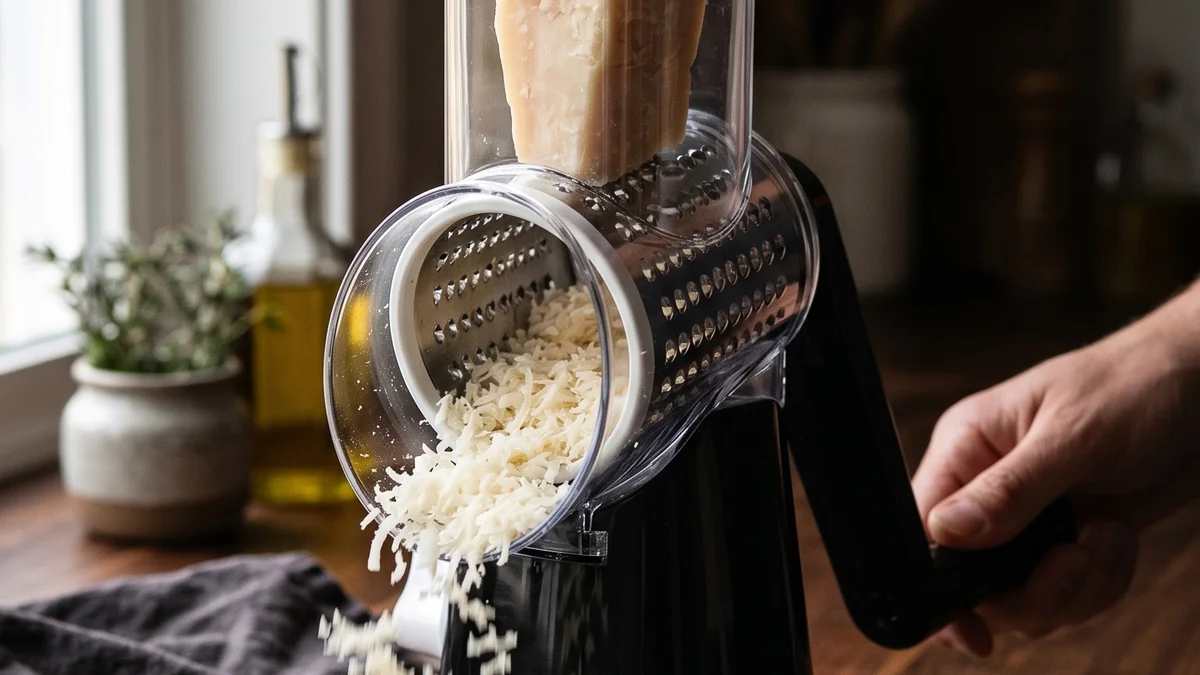
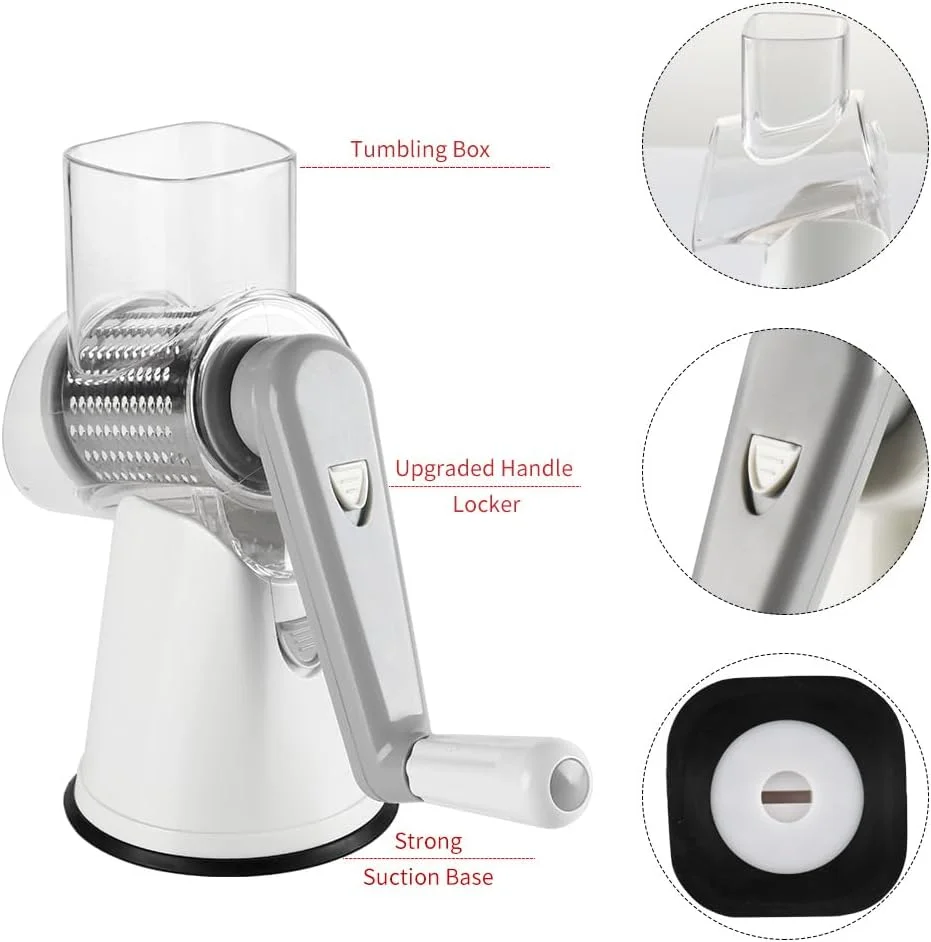
Rotary cheese graters are designed to simplify the process of grating cheese, nuts, and other foods. Unlike traditional box graters, rotary graters use a crank handle to rotate a drum with blades, making grating faster and less labor-intensive.
Common Materials and Components
Rotary cheese graters are typically made from durable materials such as stainless steel and plastic. The choice of material affects both performance and longevity.
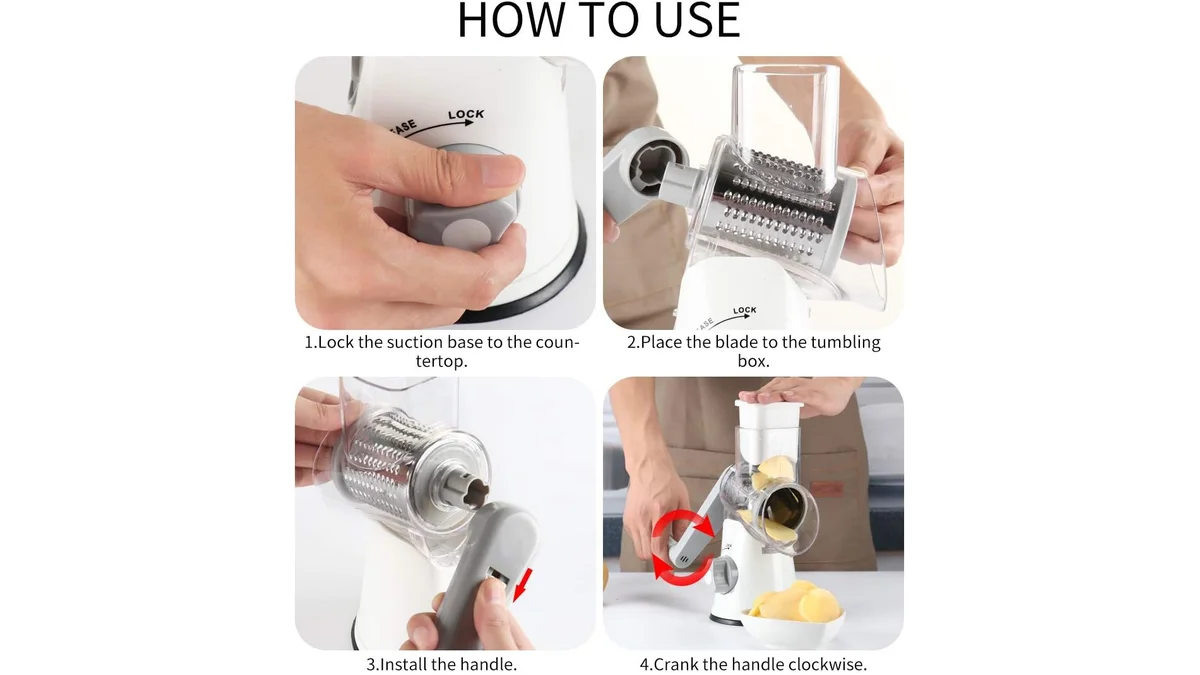
Handle and Crank Mechanism
The handle and crank mechanism are crucial for operation. A comfortable handle reduces fatigue, while a smooth crank ensures efficient grating.
Drum and Blade Components
The drum and blades are the core components. The drum’s design and blade sharpness determine the grater’s effectiveness.
| Component | Material | Function |
|---|---|---|
| Handle | Plastic / Stainless Steel | Provides grip and comfort |
| Crank Mechanism | Metal / Plastic | Transfers rotational motion |
| Drum | Stainless Steel | Holds the grating blades |
| Blades | Stainless Steel | Grates cheese or other food |
Why Regular Cleaning Is Essential
Regular cleaning is not just a matter of hygiene — it’s essential for maintaining performance and ensuring food safety.
Food Safety Concerns
When cheese and other foods are grated, they leave behind residue that becomes a breeding ground for bacteria. Regular cleaning mitigates this risk by removing the residue bacteria feed on.
Cleaning your grater after each use also prevents cross-contamination — particularly important when grating different types of cheese or other foods.
Maintaining Grater Performance
Cheese residue can harden and cause blades to become dull over time. Regular maintenance ensures your grater continues to function as intended and extends its working life significantly.
Tools and Supplies Needed for Cleaning
Having the right equipment makes the process more efficient and ensures a thorough clean.
Basic Cleaning Supplies
| Tool / Supply | Description | Use |
|---|---|---|
| Dish Soap | Mild soap | General cleaning |
| Warm Water | Mixed with soap | General cleaning |
| Soft-bristled Brush | Gentle on surfaces | Removing cheese residue |
| Microfiber Cloth | Effective for drying | Drying and polishing |
Optional Tools for Deep Cleaning
- Specialized cleaning brushes — reach into tight spaces and corners
- Sanitizing solutions — eliminate bacteria and microorganisms. Always rinse thoroughly after sanitizing.
Safety Precautions Before Cleaning
Before cleaning, take necessary precautions to avoid injury from sharp blades.
Handling Sharp Blades Safely
Always grasp the grater firmly and avoid touching blades directly. Consider wearing cut-resistant gloves when inspecting or cleaning blades.
Protecting Your Hands During Cleaning
| Safety Measure | Description | Benefit |
|---|---|---|
| Cut-resistant gloves | Protects hands from sharp edges | Prevents cuts and injuries |
| Thick rubber gloves | Provides grip and protection | Enhances safety during cleaning |
| Keep hands dry | Maintains firm grip | Reduces risk of accidents |
Quick Cleaning Method for Daily Use
A quick daily cleaning routine keeps your grater hygienic and performing well.
Immediate After-Use Cleaning Steps
Step 1 — Remove loose particles: Gently tap the grater over a trash can or sink. This prevents cheese from becoming stubborn residue.
Step 2 — Quick rinse: Run the grater under warm water. Use a soft brush or sponge to gently scrub blades and crevices.
Step 3 — Dry and store: Dry thoroughly with a towel, paying extra attention to blades and crevices where moisture accumulates.
Tips for effective drying and storage:
- Use a soft, dry cloth to wipe down all parts
- Store in a dry place, away from direct sunlight
- Consider a protective case or bag to prevent damage
How to Clean a Rotary Cheese Grater Thoroughly
Deep cleaning removes accumulated residue that everyday rinsing misses.
Step-by-Step Deep Cleaning Process
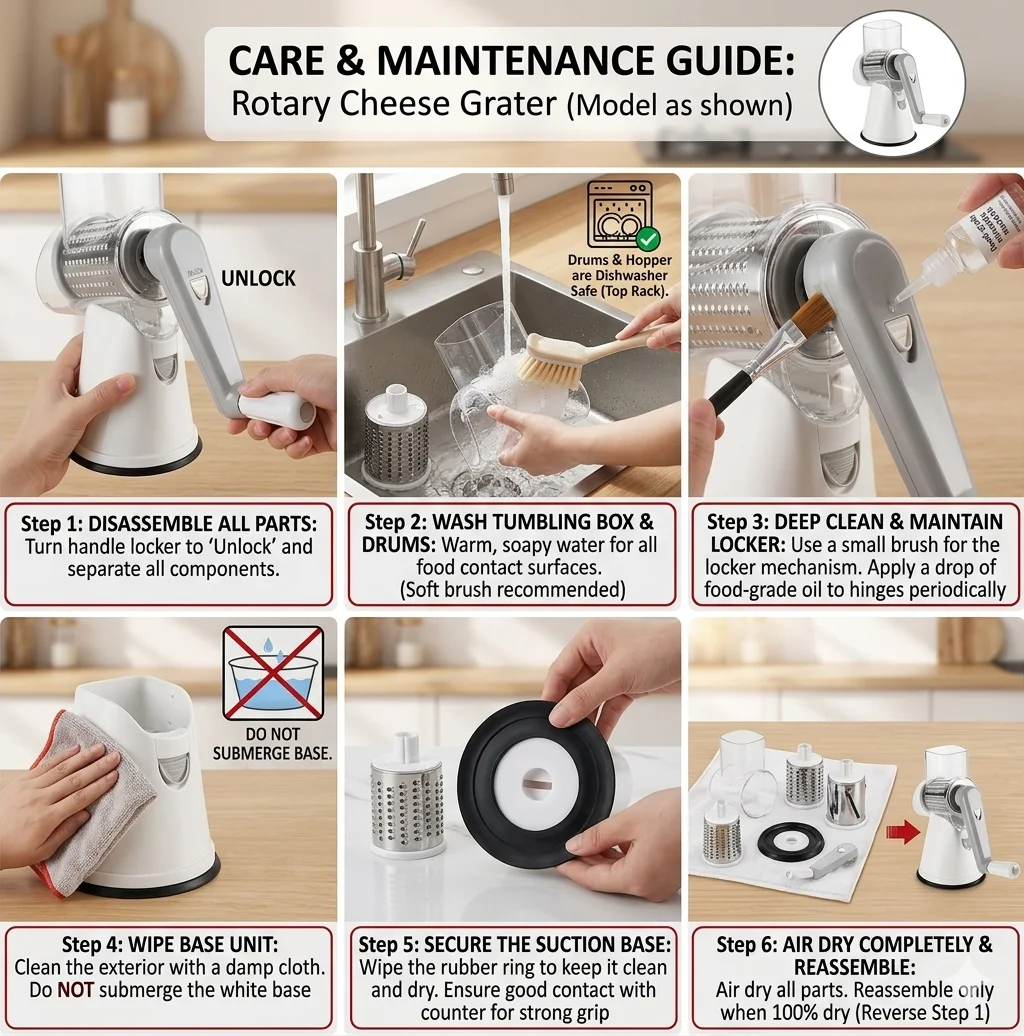
Step 1 — Disassemble: Take the grater apart so each component can be cleaned individually.
Step 2 — Soak: Submerge components in warm, soapy water for 15–20 minutes. This loosens dried cheese and debris. Always check the manufacturer’s instructions before submerging any parts.
Step 3 — Scrub: Use a soft-bristled brush or non-abrasive scrubber to remove remaining residue. Pay particular attention to the blades and grating surfaces — these accumulate the most debris.
Step 4 — Rinse: Rinse all parts thoroughly under warm running water.
Step 5 — Dry and reassemble: Dry completely before reassembly to prevent rust and moisture buildup.
Handling Stubborn Cheese Residue
For particularly stubborn residue:
- Warm water soak — run warm water over affected areas or soak parts again
- Gentle scraping — use a plastic scraper to remove debris without scratching surfaces
- Baking soda paste — apply to the stuck residue, let sit 15 minutes, then scrub gently
Natural Cleaning Solutions for Rotary Cheese Graters
Natural solutions are eco-friendly, gentle on materials, and highly effective.
Vinegar-Based Cleaning
Mix equal parts water and white vinegar. Soak or wipe down the grater with this solution to dissolve mineral deposits and cheese residue. After soaking, use a soft brush to scrub away remaining debris, then rinse thoroughly.
Lemon and Salt Scrub
Cut a lemon in half, dip it in salt, and scrub the grater directly. The citric acid breaks down tough stains while salt acts as a gentle abrasive. Rinse thoroughly with warm water.
Baking Soda Applications
Paste method for tough stains: Mix baking soda with a small amount of water to form a paste. Apply to stained areas, let sit 15–30 minutes, scrub gently with a soft-bristled brush, then rinse.
Soaking solution for deodorizing: Dissolve 1 tablespoon of baking soda per cup of warm water. Soak the grater for several hours or overnight, then rinse and dry thoroughly.
The Cambom Rotary Cheese Grater is built with dishwasher-safe, BPA-free parts designed for easy cleaning. All three drum blades detach in seconds.
View on Amazon →Frequently Asked Questions
How often should I clean my rotary cheese grater?
After every use. Cleaning immediately after use prevents cheese residue from hardening on the blades, which is much harder to remove once dried.
What is the best way to clean a rotary cheese grater?
Disassemble it, soak the parts in warm soapy water for 15–20 minutes, then use a soft brush to remove residue. Natural solutions like vinegar or baking soda work well for tougher stains.
Can I put my rotary cheese grater in the dishwasher?
The Cambom Rotary Cheese Grater is dishwasher-safe — all drum blades and the collection container detach for easy cleaning. Always check the manufacturer’s instructions for other brands, as some plastic components may warp at high temperatures.
How do I remove stubborn cheese residue?
Soak the affected parts in warm water, or apply a baking soda and water paste. Let it sit for 15 minutes, then scrub gently with a soft brush. A plastic scraper can help with particularly stuck residue without scratching surfaces.
Are there different cleaning approaches for different materials?
Yes. Stainless steel components can handle more abrasive cleaning than plastic parts. For stainless steel drums and blades, a vinegar soak works well. For plastic parts, stick to mild dish soap and a soft cloth.
How can I sanitize my rotary cheese grater?
Run it through the dishwasher on a hot cycle if dishwasher-safe. Alternatively, soak parts in a food-grade sanitizing solution (following dilution instructions), then rinse thoroughly with clean water.
What are the most common cleaning mistakes to avoid?
- Using excessive force on delicate blade components
- Improper reassembly — always make sure blades are seated correctly before use
- Storing while damp — always dry thoroughly before storage to prevent rust and bacteria
- Neglecting the crank mechanism — cheese oil can build up in the axle over time